Lab 1: Warm-up
The goal of this assignment is to familiarize you with the environment that you will be using for labs/projects in the course. It includes the introduction of the integrated development environment (VSCode and Docker) and the building/debugging tools (g++, make, and gdb).
Besides setting up the environment, you also need to complete the class IntArray which stores an array of ints.
This is a good chance for you to review the basics of C++, including constructors, destructors, loops, and memory management.
1. Installing Visual Studio Code and Docker
The very first step is to install the latest stable version of Visual Studio Code (VSCode) and Docker. VSCode provides a graphical user interface for you to write and debug code. Docker will be used to create a virtual Linux system for running and testing your code on top of your local operating system.
After installing VSCode, you must install the Remote - Containers extension. This is required for launching the Linux system and running local tests. You may also install other extensions if you find them useful.
You have to launch Docker before going to the next step. You should see “a whale carrying a stack of containers” icon ( ) in the menu bar on MacOS (or in the taskbar on Windows). You can also verify the running of Docker by opening the “Terminal” application (or “Powershell” on Windows) and run the following:
docker --version
and it should print something like the following:
Docker version 20.10.7, build f0df350
❗️ NOTE: If you’re using a Mac, Docker provides two versions, for both Intel CPU and Apple Silicon. You can refer to Apple’s support to determine what chip your Mac is using, and go to Docker’s download page to get the correct version.
❗️ NOTE: For Windows users, you can either use the WSL backend or the Hyper-V backend for the “virtualization”. See this link for more details.
❗️ NOTE: Docker is popular but complex. Understanding its internals is beyond this course. You could refer to Docker’s tutorial for detailed discussions.
2. Coding in VSCode
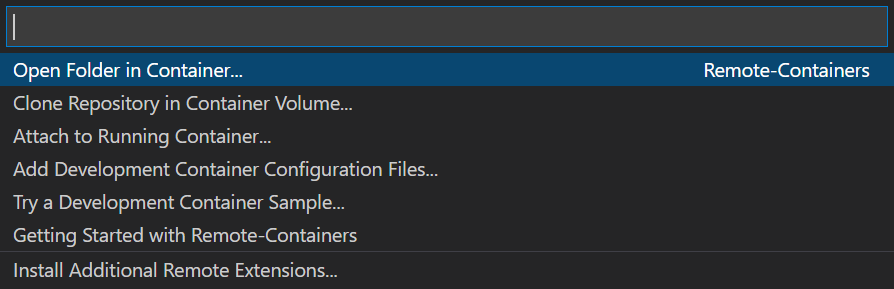
You can now launch VSCode and click on the “><” icon (![]() ) in the bottom-left corner. You should then select
) in the bottom-left corner. You should then select Open Folder in Container... (as shown in the figure below) and choose the folder for this lab (e.g., /Users/Sherlock/Downloads/lab1-main/ after you decompress the zip file that contains all the Makefile, .cpp, and .h files; note that some file archivers automatically create a parent folder when unzipping, e.g., /Users/Sherlock/Downloads/lab1-main/lab1-main/, for which you should open the inner folder that contains all the files for the lab).
This will run Docker to set up the Linux system. Note that the first time running it may take a while. (If there is some dialog popped up asking for permission, simply click on “Trust Folder & Continue”.)
Now you should be able to see a list of files and folders in the sidebar on the left. Below is the description of them:
.devcontainer: configuration for development environment in Docker; DO NOT modify the file(s) in this folder.vscode: predefined configurations to facilitate development; DO NOT modify the file(s) in this folder.gitignore: you can IGNORE this fileIntArray.handIntArray.cpp: the definition and implementation of theIntArrayclassmain.cpp: the entry of the program, where your test cases resideMakefile: configurations formake
Now you can select any file from the file list and edit it. There are lots of tricks and short-cuts in VSCode that may improve your coding experience. You can refer to this page and this page for more information.
❗️ NOTE:
You need to change the content of IntArray.cpp (search for “TODO” in the file) to complete the IntArray class. You may also modify main.cpp to add your own test cases but they will not be used for grading.
3. The IntArray class
You can see the definition of the class in IntArray.h. It has two member variables, length indicating the size of the array and storedArray pointing to the internal array that stores the integers. You need to implement 1) the constructor, 2) the destructor, and 3) the reverse method that reverses the array, in IntArray.cpp.
🍿 Example: Suppose the array is nums=[1,10,2,1,3]. The reverse of nums is [3,1,2,10,1].
🦄 Challenge: Can you do the reverse in-place, that is, do not create a new array but using only simple temporary variables for storage within the method?
📖 Convention: We will use the Doxygen style for comments.
4. Writing test cases
In this and all future labs/project, a main.cpp file will be provided. It may contain some simple test cases (or skeletons) used for your own testing on the local machine. In this lab, it is a client of the IntArray class: it creates an IntArray object, fills the array with some random values, and call reverse. (See comments in the file for detailed description.)
We encourage you to modify the content of the file to create new test cases for more comprehensive testing.
❗️ NOTE:
Test cases like the one in main.cpp are written in an ad hoc way and are hard to maintain when a project grows. We will discuss how to write “good” test cases utilizing the doctest testing framework during class meetings in the future.
5. Building and testing
When your IntArray and test cases are ready, you should compile the code and actually run the tests using various tools. The Linux system already includes a few of them:
- GCC: compiler to translate C++ code to executable machine code
- Make: code management and build automation tool; it executes rules defined in the
Makefile - AddressSanitizer: a memory error detector
To use the above tools, open the integrated terminal in VSCode by following the instructions. You shall now see it in the panel below the editor region in which you can interact with the running virtual Linux system:

Inside the terminal, you can run the following command to build the executable and run the test cases:
make clean test
Specifically, this runs the clean and test rules in Makefile. It removes the old build, compiles main.cpp and IntArray.cpp to generate a new executable main.out using g++, and then executes ./main.out.
Below is a sample output of one run of the correct implementation of IntArray using the original tests in main.cpp:

❗️ NOTE: If you see any errors during testing, for example segmentation fault (SEGV), try to debug by yourself first before reaching out to your classmates/tutors/TAs/instructors for help.
❗️ NOTE: If you are not familiar with the first two tools, GCC and Make, we recommend you to take a look at the g++ and make slides and C++ tutorial to get a general idea about them and compilation in general. However, knowing the internals of AddressSanitizer is not required in this course. We just use it to check memory bugs.
6. Debugging
You will use gdb for debugging inside VSCode, following the guide.
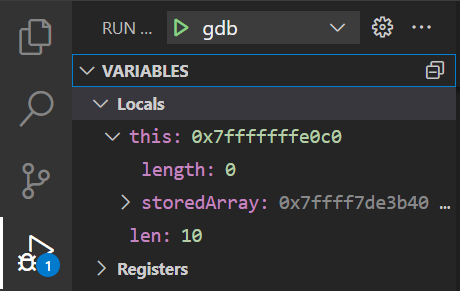
Note that the C/C++ debugger extension is already installed in VSCode and the Linux system. The launch configuration of gdb is also provided in .vscode/launch.json. You just need to click the “green arrow” icon in front of “gdb” to start a debugging process after setting breakpoints, as shown below:
7. Submitting the code
After testing the program locally, you should submit IntArray.cpp to the autograding system.
The autograder will run a Linux system using the same configuration as in your local development environment. It first applies a static checker cppcheck for code style checking. You can refer to the output for any useful suggestions. Below is an example:
[IntArray.cpp:10]: (warning) Member variable 'IntArray::storedArray' is not initialized in the constructor.
[IntArray.cpp:10]: (warning) Member variable 'IntArray::length' is not initialized in the constructor.
The autograder then runs a set of doctest test cases and checks the output of your code:
- For any submission before the deadline, you will only see pass/fail and score of each test case.
- The complete output of each case will be shown only after the final score is determined.
- The limit for submission per day is 5. After that, you can continue to submit, but you will see no feedback for those submissions.
- The most recent submission will be used for the final score.
- In this lab, there are 5 cases for testing the constructor/destructor of
IntArraythat only create and destroy an array, and 5 cases that invoke thereversemethod. - If a test case is correctly executed (i.e., returns correctly) without any run-time memory error (i.e., there is no report from AddressSanitizer), you will get 3 points.
- If a test case returns correctly but has memory error, you will get 2 points.
- You will receive 0 points otherwise.