Lab 6: Directed Graphs
In this lab, you will complete the DiGraphAdjList class that implements the DiGraph ADT (i.e., directed graphs) using adjacency list.
1. Open lab folder in VSCode
Follow the instructions from Lab 1 to open the lab folder in VSCode.
The new files in this lab are
DiGraph.h: definition of theDiGraphADT for directed graphsDiGraphAdjList.h: definition of theDiGraphAdjListclass, as subclass ofDiGraphbased on adjacency listDiGraphAdjList.cpp: the actual implementation of functins inDiGraphAdjListclass
2. Directed graphs and its representation
A graph consists of 1) a set of nodes and 2) a set of zero or more edges each of which connects two nodes.
Directed graphs are a special kind of graph in which the edges have directions (from a source node to a target node). It is useful for certain tasks, for example, to indicate the flow of data in a network. You can find the definition in DiGraph.h.
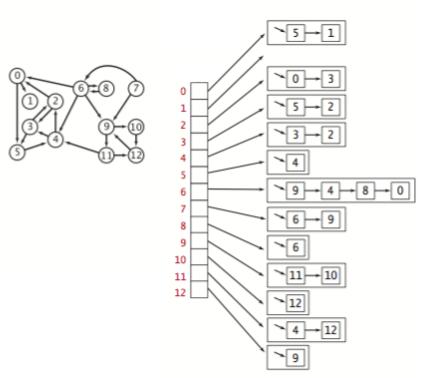
The DiGraphAdjList class declared in DiGraphAdjList.h implements the DiGraph ADT using adjacency list. It maintains an array of lists indexed by node ID. Each list stores the adjacent nodes.
Below is an example directed graph and its adjacency list representation.
You need to complete the hasEdge, addEdge, and delEdge functions in DiGraphAdjList.cpp.
hasEdgedetermine if an edgev1->v2is in the graph.addEdgeadd edgev1->v2to the graph.delEdgeremoves edgev1->v2from the graph.
❗️ NOTE: Each node in the DiGraph has an int ID and you will use the ID throughout the implementation to refer to a node.
3. Cycles
A directed cycle is a directed path (with at least one edge) whose first and last vertices are the same.
For example, in the above example, path 0->5->4->2->0 is a cycle.
You need to complete the hasCycle function in DiGraphAdjList.cpp that checks if the graph has cycles in it.
🥮 Tips: You may refer to Erickson §6.2.
4. Build and test
A sample doctest test case is given in main.cpp. You should add your own tests for more comprehensive testing. The test cases will not be used for grading.
You can run make clean test to run the doctest cases.
5. Submitting the code
After testing the program locally, you should submit DiGraphAdjList.cpp to the autograding system.
There will be 10 test cases in total to evaluate your implementation. For each passing test case, you will get 3 points if there is no memory error and 2 points if there are memory errors.
You may refer to the instructions from Lab 1 for more instructions.